Introduction: Why Grow an Avocado Seed?
Growing an avocado seed (Persea americana) is a fun, low-cost way to bring a tropical touch to your home—no green thumb required. Whether you want a decorative houseplant or dream of eventually harvesting avocados (a long-term goal!), sprouting an avocado pit is a rewarding project for gardeners of all skill levels.
Avocado seeds are easy to source (just save the pit from your next ripe avocado) and take 2–8 weeks to sprout, depending on the method. While it can take 7–10 years for a seed-grown avocado tree to bear fruit (and the fruit may differ from the parent avocado), the process of watching the pit split, roots grow, and leaves unfurl is satisfying on its own. This guide walks you through two simple methods to grow an avocado seed—water propagation (the most popular) and soil planting—plus how to care for your seedling as it grows.
Part 1: Preparing the Avocado Seed
Before you start, you need a healthy avocado seed and a few basic supplies. The key to success starts with choosing the right pit and prepping it properly.
1.1 Choosing a Ripe Avocado (And Extracting the Seed)
First, select a ripe avocado—this ensures the seed inside is mature and viable. A ripe avocado:
- Yields slightly when gently squeezed (not too soft, or it’s overripe).
- Has unblemished skin (avoid avocados with mold, bruises, or soft spots).
- Is a variety suited to your climate (if you plan to eventually plant it outdoors):
- ‘Hass’: The most common variety, grows well in Zones 9–11.
- ‘Fuerte’: Cold-hardy (down to 28°F/-2°C), ideal for Zones 8–11.
- ‘Bacon’: Tolerates light frost, good for Zones 8–11.
To extract the seed:
- Cut the avocado in half lengthwise (around the pit), then twist the two halves apart.
- Gently scoop out the pit with a spoon—avoid piercing or damaging the outer brown skin (this is the seed coat, which protects the inner embryo).
- Rinse the pit under warm water to remove any leftover avocado flesh—dried flesh can attract mold. Do not scrub or peel the brown seed coat (this can harm the seed).
1.2 Identifying the “Top” and “Bottom” of the Seed
Avocado seeds have a distinct top and bottom—planting them upside down will delay sprouting or prevent it entirely. Here’s how to tell them apart:
- Bottom: The slightly flatter end, where the seed was attached to the avocado’s stem (you may see a small indentation or leftover root nub). This is where roots will grow.
- Top: The pointed, rounded end. This is where the stem and leaves will emerge.
Mark the top with a pencil or permanent marker if you’re unsure—this avoids confusion later.
Part 2: Method 1 – Water Propagation (Easiest for Beginners)
Water propagation is the most popular way to grow avocado seeds because it lets you watch roots and stems develop. You’ll need:
- A clean avocado seed.
- 3–4 toothpicks or wooden skewers.
- A clear glass jar or cup (16–24 ounces).
- Room-temperature water.
2.1 Step-by-Step Water Propagation
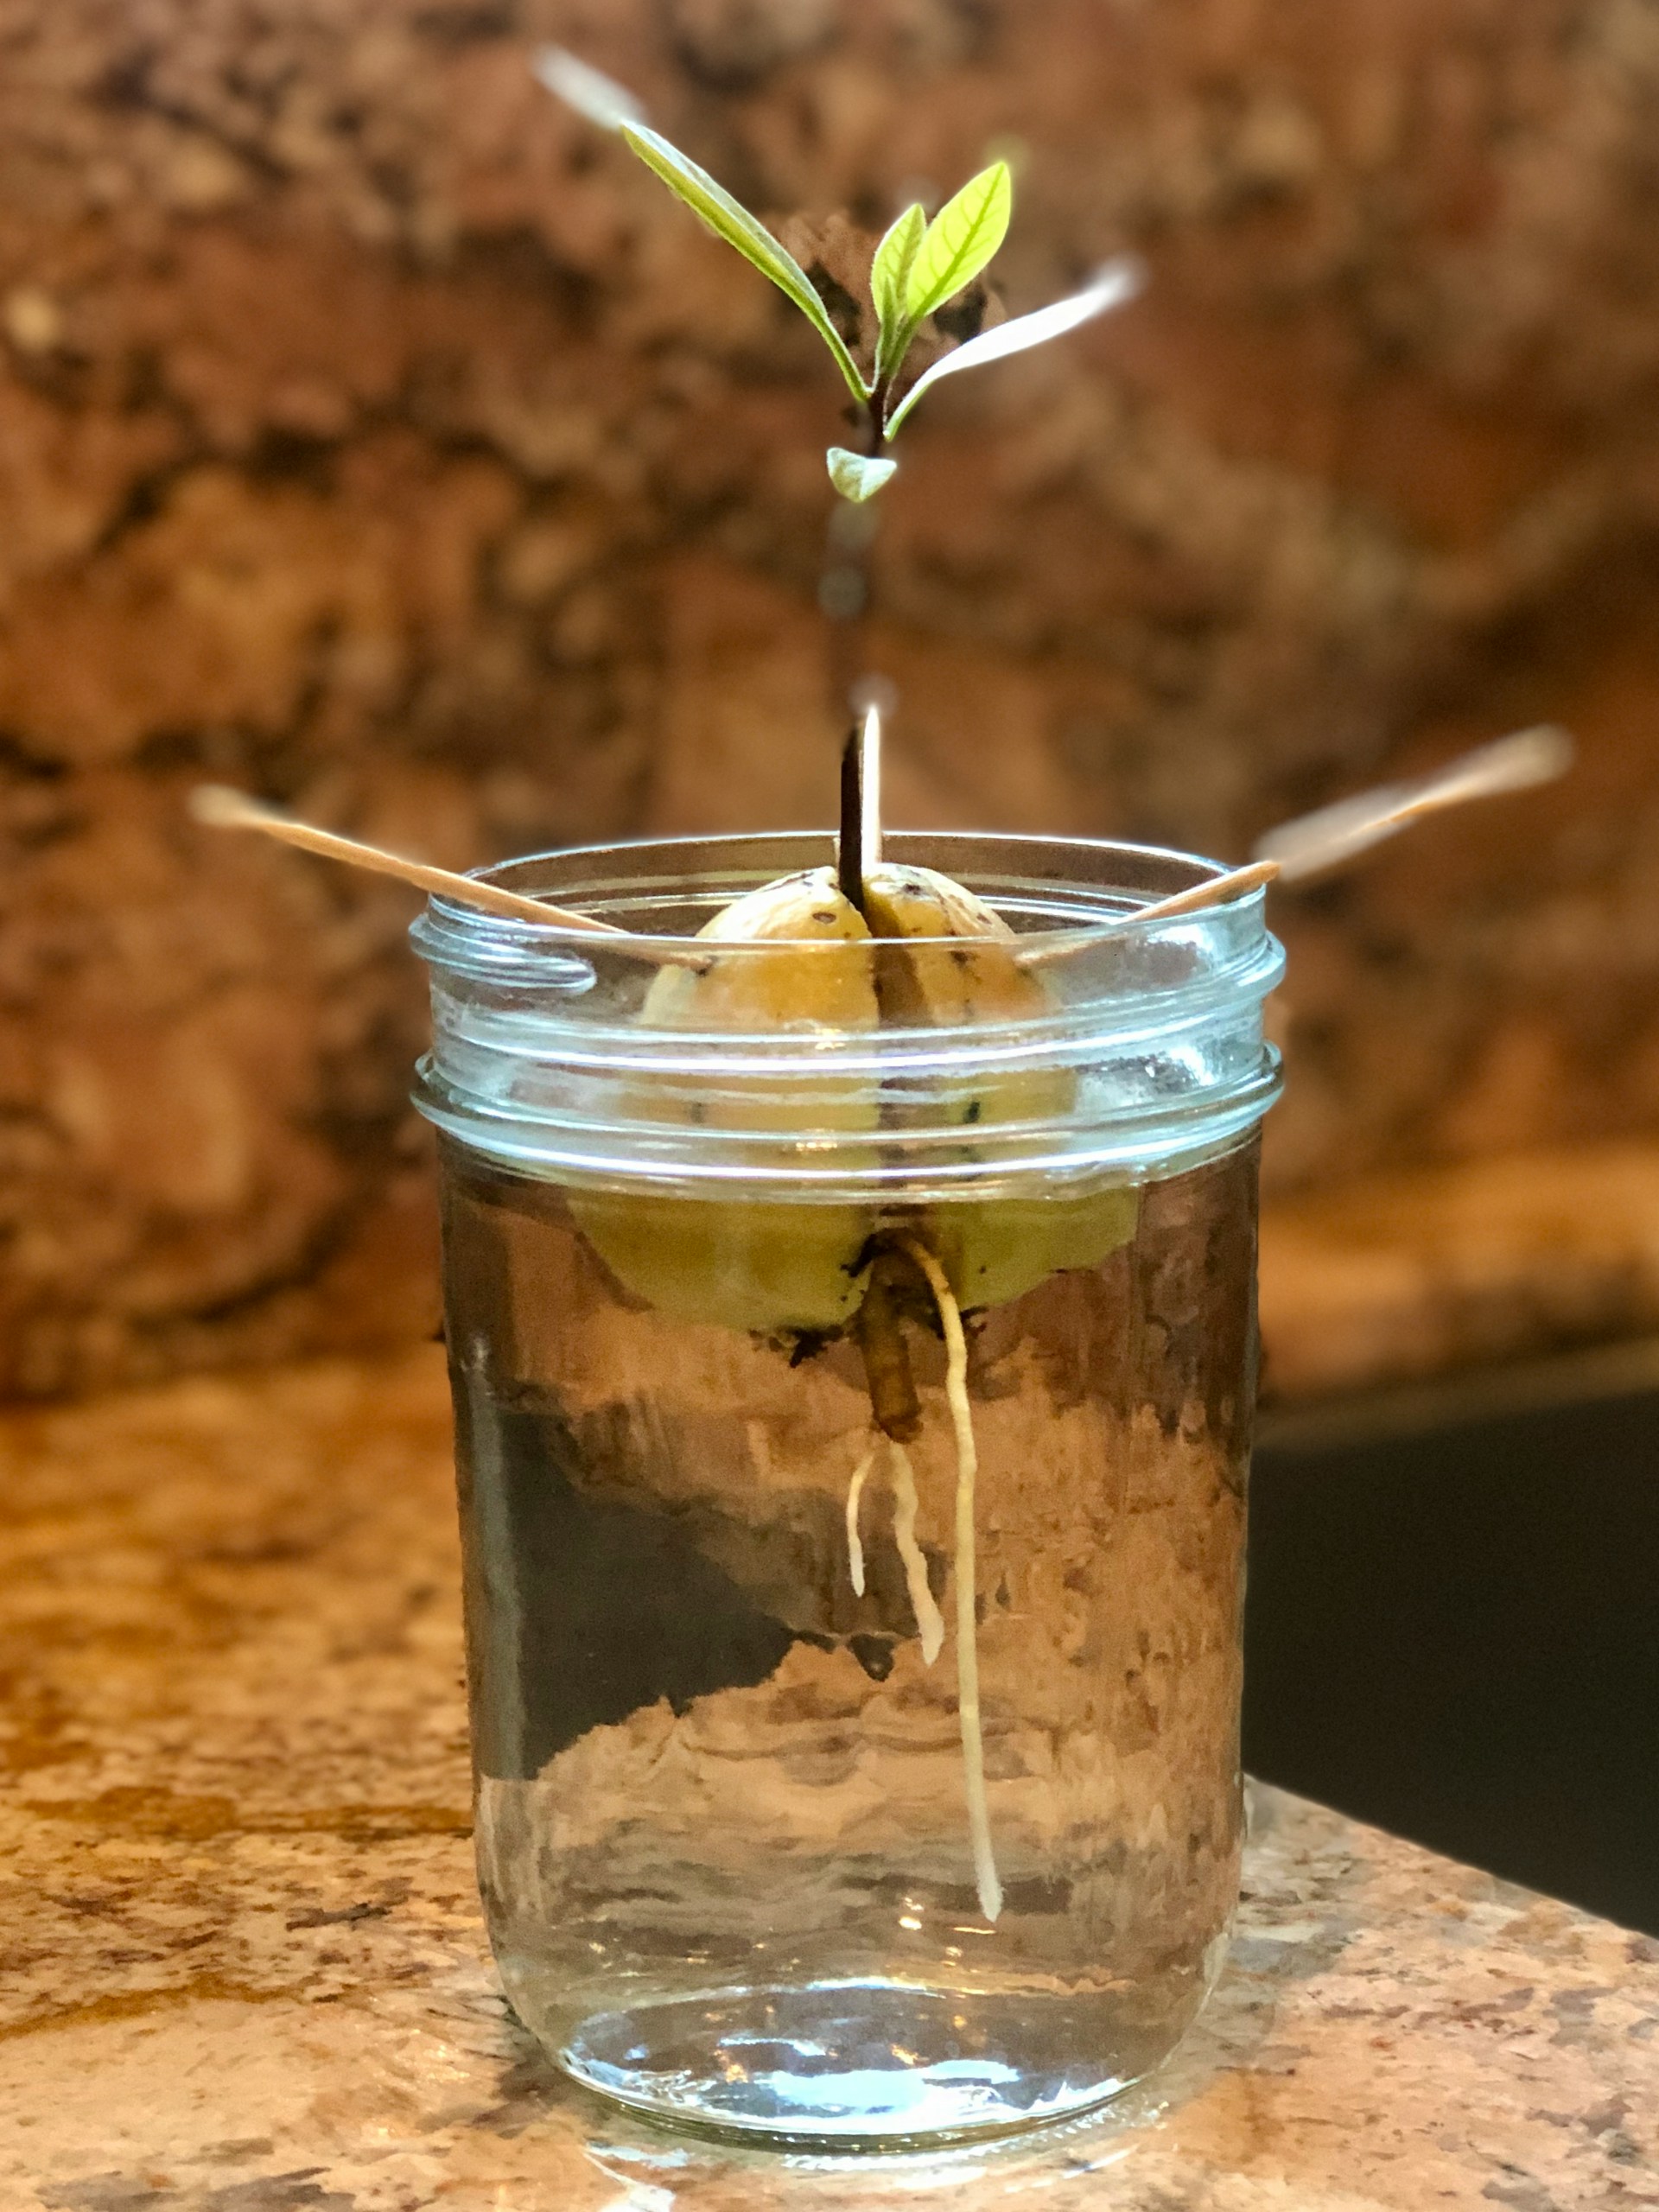
- Insert Toothpicks: Gently push 3–4 toothpicks into the side of the seed, spaced evenly around the middle. The toothpicks should be inserted ¼ inch deep—enough to hold the seed upright without piercing the inner white flesh.
- Set Up the Jar: Fill the glass jar with room-temperature water (not cold or hot—extremes slow growth). Place the seed on top of the jar, using the toothpicks to rest it on the rim.
- Submerge the Bottom: Adjust the seed so the bottom ½ of the pit is submerged in water. The top ½ should stay dry—this prevents the seed from rotting while keeping the root zone moist.
- Find the Right Spot: Place the jar in a warm (65–75°F/18–24°C), bright location with indirect sunlight. Avoid direct sun (it can heat the water and damage the seed) and cold drafts (e.g., near windows in winter).
2.2 Caring for the Seed During Water Propagation
- Change Water Regularly: Replace the water every 2–3 days to keep it clean and oxygenated. Stagnant water causes mold and root rot. When changing water, check that the bottom ½ of the seed stays submerged—add more water if needed.
- Watch for Mold: If you see white or green mold on the seed coat, gently wipe it off with a damp paper towel. Do not remove the seed coat unless it falls off naturally—mold is common and usually harmless if you keep the water clean.
- Be Patient: It takes 2–8 weeks for the seed to sprout. Here’s what to expect:
- Weeks 1–3: The seed coat may split open at the bottom, revealing a small white root nub.
- Weeks 3–6: Roots grow longer (1–3 inches) and start branching. A green shoot emerges from the top of the seed.
- Weeks 6–8: The shoot grows taller (3–6 inches) and unfurls its first set of leaves (called “cotyledons”—large, oval, and glossy).
Part 3: Method 2 – Soil Planting (Faster Root Growth)
Soil planting is a good option if you prefer to skip the water stage or want to avoid mold. It often leads to stronger, faster root growth, though you can’t see the roots develop. You’ll need:
- A clean avocado seed.
- A small pot (6–8 inches in diameter) with drainage holes (avocados hate soggy soil).
- Well-draining potting mix (use a mix for tropical plants or make your own: 2 parts potting soil + 1 part perlite + 1 part peat moss).
- Room-temperature water.
3.1 Step-by-Step Soil Planting
- Prepare the Pot: Fill the pot ¾ full with moist potting mix. Gently pat the soil down to eliminate air pockets.
- Plant the Seed: Make a small hole (1–2 inches deep) in the center of the soil. Place the seed in the hole with the bottom (root end) down and the top ¼ of the seed above the soil surface.
- Cover and Water: Fill the hole with soil, leaving the top of the seed exposed. Water the soil thoroughly until water drains out the bottom of the pot—this settles the soil around the seed.
- Choose a Location: Place the pot in a warm (65–75°F/18–24°C), bright spot with indirect sunlight. Avoid direct sun (it can dry out the soil too quickly) and cold windowsills.
3.2 Caring for the Seed During Soil Planting
- Keep Soil Moist (But Not Soggy): Water the soil when the top 1 inch feels dry. Stick your finger into the soil—if it’s dry, water until it drains out the bottom. Overwatering causes root rot; underwatering dries out the seed.
- Wait for Sprouting: Soil-planted seeds take 3–6 weeks to sprout (slightly faster than water propagation for some varieties). You’ll first see a green shoot emerge from the top of the seed, followed by leaves.
- Avoid Disturbing the Soil: Resist the urge to dig up the seed to check for roots—this can damage new growth. Trust the process: if the soil stays moist and the temperature is right, it will sprout.
Part 4: Transplanting the Avocado Seedling (When It’s Ready)
Once your avocado seedling is 6–8 inches tall and has 2–3 sets of true leaves (the second set of leaves, which are smaller and more oval than the initial cotyledons), it’s time to transplant it to a larger pot. This gives the roots room to grow and prevents the plant from becoming root-bound.
4.1 What You’ll Need
- A larger pot (10–12 inches in diameter) with drainage holes.
- Well-draining potting mix (tropical plant mix or the same mix used for soil planting).
- A small trowel or spoon.
- Room-temperature water.
4.2 Step-by-Step Transplanting
- Prepare the New Pot: Fill the new pot ⅓ full with moist potting mix.
- Remove the Seedling:
- From Water: Gently lift the seedling by the base of the stem (not the leaves) and remove the toothpicks. Rinse the roots lightly to remove any water residue (optional).
- From Soil: Tip the old pot on its side and gently pull the seedling out by the stem. If it’s stuck, tap the pot’s bottom or squeeze the sides to loosen the soil.
- Plant in the New Pot: Make a hole in the center of the new pot’s soil that’s deep enough to hold the seedling’s roots (the seed should still be ¼ above the soil surface, same as before). Place the seedling in the hole and fill in with soil, patting gently to secure it.
- Water Thoroughly: Water the soil until it drains out the bottom—this helps the roots settle into the new soil.
4.3 Post-Transplant Care
- Keep in Indirect Light: For the first 1–2 weeks, place the seedling in indirect sunlight to reduce stress. After that, move it to a spot with bright, indirect light (e.g., a south-facing window with a sheer curtain).
- Avoid Fertilizer: Wait 4–6 weeks after transplanting to fertilize—new roots are sensitive, and fertilizer can burn them.
Part 5: Caring for Your Avocado Seedling (Long-Term)
Avocado seedlings are tropical plants, so they need warm temperatures, consistent moisture, and the right light to thrive. Follow these tips to keep your plant healthy:
5.1 Light Requirements
Avocado seedlings need bright, indirect sunlight (4–6 hours per day).
- Indoor Care: Place near a south or west-facing window with a sheer curtain (direct sun can scorch leaves). If you don’t have enough natural light, use an LED grow light (set to 12–14 hours per day, positioned 6–8 inches above the plant).
- Outdoor Care (Zones 9–11): Once the seedling is 1–2 years old and temperatures stay above 50°F/10°C, you can move it outdoors. Choose a spot with partial shade (full sun for mature trees, but seedlings need protection).
5.2 Watering Guidelines
Avocados like moist soil but hate standing water.
- Frequency: Water when the top 1–2 inches of soil feels dry. In summer (or warm indoor conditions), this may mean watering every 3–4 days; in winter, every 7–10 days.
- Method: Water slowly at the base of the plant until water drains out the bottom. Avoid wetting the leaves—this can cause fungal diseases like powdery mildew.
- Pro Tip: Use room-temperature water—cold water shocks the roots and slows growth.
5.3 Fertilizing Schedule
Avocado seedlings need regular nutrients to grow, but too much fertilizer can damage roots.
- Timing: Start fertilizing 4–6 weeks after transplanting (or when the seedling has 3+ sets of true leaves).
- Type: Use a balanced, water-soluble fertilizer (10-10-10) diluted to half strength, or a fertilizer specifically for avocado/ tropical plants.
- Frequency: Fertilize every 4–6 weeks during spring and summer (growing season). Stop fertilizing in fall and winter (growth slows down).
5.4 Pruning for Bushier Growth
Avocado seedlings tend to grow tall and leggy (single stem with leaves at the top) if not pruned. Pruning encourages branching and a bushier, healthier plant.
- First Prune: When the seedling is 8–10 inches tall, use clean, sharp scissors to cut the stem 6 inches from the soil. This triggers new growth from the sides.
- Subsequent Pruning: Once new branches grow to 6–8 inches, prune their tips to encourage more branching. Always prune just above a leaf node (the spot where a leaf attaches to the stem)—new growth will sprout from here.
5.5 Pest & Disease Control
Avocado seedlings are relatively pest-resistant, but indoor plants can attract common houseplant pests.
- Common Pests:
- Aphids: Tiny green/black bugs on new growth. Wipe them off with a damp cloth or spray with soapy water.
- Spider Mites: Tiny red bugs that leave webbing on leaves. Increase humidity (mist leaves) and spray with neem oil.
- Mealybugs: White, cottony bugs in leaf axils. Dab them with rubbing alcohol on a cotton swab.
- Common Diseases:
- Root Rot: Caused by overwatering. Signs include yellow leaves and mushy stems. Fix by reducing watering and repotting in fresh, well-draining soil.
- Powdery Mildew: White, powdery coating on leaves. Caused by high humidity and poor air flow. Improve ventilation and spray with a baking soda solution (1 tablespoon baking soda + 1 teaspoon oil + 1 gallon water).
Part 6: Can You Grow Avocados Indoors to Fruit?
While it’s possible to grow an avocado tree indoors, it’s important to set realistic expectations:
- Time to Fruit: A seed-grown avocado tree takes 7–10 years to bear fruit (if it fruits at all). Grafted trees (sold at nurseries) fruit in 3–5 years, but they’re not grown from seeds.
- Pollination: Avocado trees need cross-pollination (pollen from a different variety) to produce fruit. If you only have one tree, even outdoors, it may not fruit. Indoors, you’ll need to hand-pollinate flowers with a small paintbrush.
- Size: Mature avocado trees grow 30–40 feet tall. Indoor trees can be kept smaller with regular pruning, but this may reduce fruiting potential.
If your goal is to harvest avocados, consider buying a grafted tree. If you just want a beautiful houseplant, growing from seed is perfect!
Conclusion: Enjoy the Journey of Growing Your Avocado Tree
Growing an avocado seed is a simple, rewarding project that lets you connect with nature—even if you don’t have a yard. Whether you choose water propagation (to watch roots grow) or soil planting (for faster growth), the process of nurturing a tiny pit into a leafy seedling is satisfying and fun.
Remember: patience is key. Avocado seeds take time to sprout, and seedlings grow slowly—but with the right care (bright light, consistent water, and occasional pruning), your plant will thrive for years. Even if it never bears fruit, it will add a lush, tropical vibe to your home.
Now that you know how to do it, grab an avocado, save the pit, and start growing—your new avocado seedling is just a few weeks away!
If you want a printable avocado seed growth tracker to log when your seed sprouts, roots grow, and leaves unfurl, just let me know—I can create one that helps you monitor your seedling’s progress step by step.


